Why Plex and IPTV Make a Genuinely Useful Combination
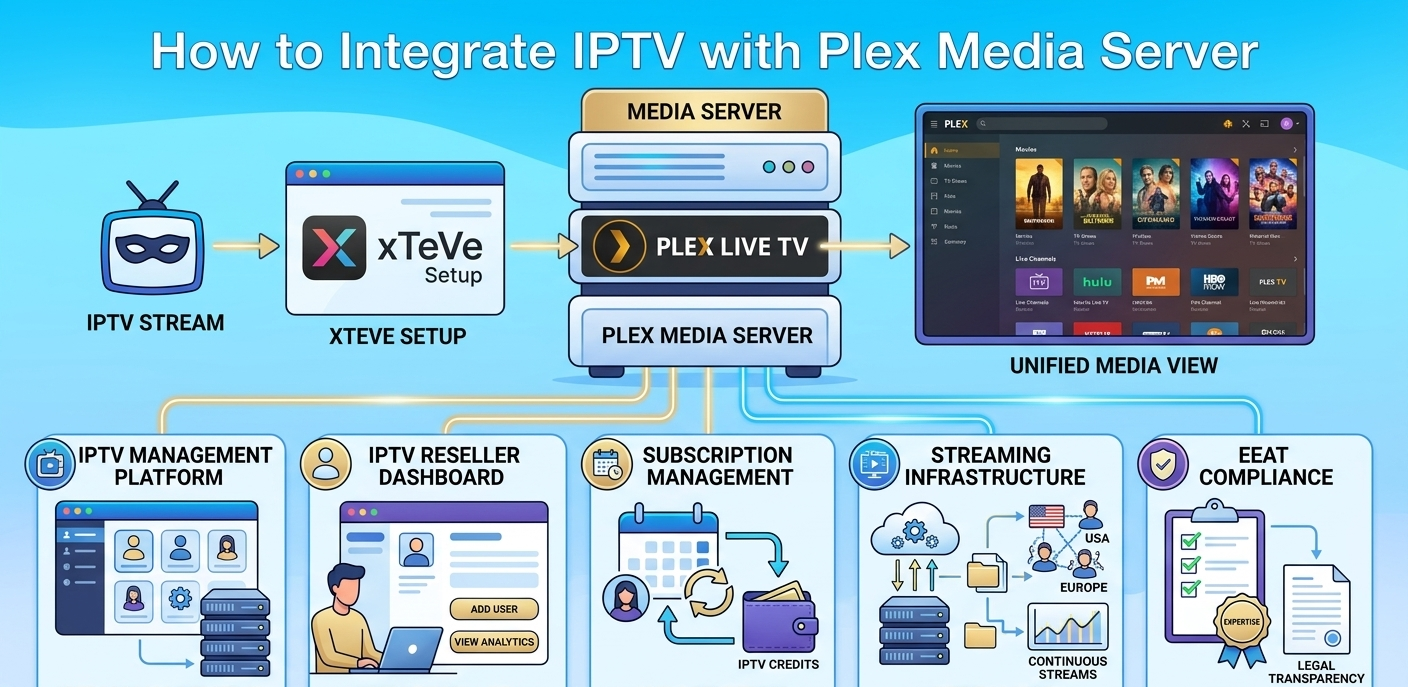
Plex is primarily known as a media server for organising personal movie and TV libraries. What fewer people realise is that it also supports live TV and DVR functionality through its Live TV & DVR feature — and with the right setup, your IPTV subscription feeds directly into Plex as a virtual tuner.
The result is a unified interface where your personal media library, on-demand streaming services, and live IPTV channels all appear in one place. For households that already use Plex and want to consolidate their viewing experience, this is a genuinely useful integration.
It’s not the simplest setup in this guide series — there are several components involved and the configuration takes real attention. But once it’s running, it works well and doesn’t require ongoing maintenance beyond normal app upkeep.
What You Need Before Starting
Before touching any configuration, get these components in place:
1. A Plex Media Server instance Plex runs on Windows, Mac, Linux, NAS devices (Synology, QNAP), and NVIDIA Shield. You need Plex running somewhere on your home network — ideally on hardware that stays on, not your main computer. A Raspberry Pi 4, NAS device, or an always-on PC works well.
2. A Plex Pass subscription Live TV and DVR functionality in Plex requires Plex Pass. This is a paid tier — currently around £3.99/month or £39.99/year. Without it, the virtual tuner features aren’t accessible.
3. Your IPTV subscription credentials Your M3U playlist URL or Xtream codes (server address, username, password) from your reseller. You’ll need these to configure the proxy component.
4. xTeVe installed on your network xTeVe is the proxy application that sits between your IPTV service and Plex. It translates your M3U playlist into a format Plex recognises as a tuner device. This is the component most guides gloss over — getting xTeVe configured correctly is where most people run into problems.
![Plex Media Server dashboard showing Live TV section with virtual tuner option visible]](https://martcarto.shop/wp-content/uploads/2026/03/Gemini_Generated_Image_xi6ox9xi6ox9xi6o-300x147.png)
Understanding xTeVe: The Critical Middleware
xTeVe is an open-source M3U proxy designed specifically for this use case. It does two important things:
First, it presents itself to Plex as an HDHomeRun tuner — which is the hardware tuner type Plex expects for live TV. Plex doesn’t natively understand M3U playlists, but it does understand HDHomeRun tuners. xTeVe fakes being one.
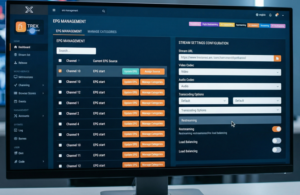
Second, it manages your M3U playlist, handles EPG (electronic programme guide) data, and maps channels to the format Plex needs for the guide interface to work.
xTeVe runs as a web application you access through a browser interface. It’s not a flashy application — it’s functional and slightly technical-feeling. Budget about 30 minutes for the initial xTeVe configuration, more if you’re troubleshooting EPG mapping issues.
Installing xTeVe:
xTeVe has releases for Windows, Mac, and Linux on its GitHub page (github.com/xteve-project/xTeVe). Download the appropriate version for your Plex server’s operating system. It runs as a single executable — no installer, just run the file. On first launch it opens a web interface at http://localhost:34400 by default.
The first-time setup wizard walks through the basic configuration. It’s reasonably clear but the EPG section in particular has options that aren’t well explained in the wizard itself.
Step-by-Step: Configuring xTeVe
Step 1 — Add your M3U playlist
In xTeVe’s web interface, go to Settings → Files/Streams. Click the plus icon to add a new M3U source. Enter your M3U URL from your IPTV provider. Name it something identifiable.
xTeVe downloads the playlist. For a large playlist (10,000+ channels), this download and parse process took about 45 seconds in my setup. Smaller playlists are faster.
Step 2 — Configure EPG source
Still in Settings → Files/Streams, add your EPG/XMLTV source. Your IPTV provider should supply an EPG URL alongside your M3U credentials — if they haven’t, ask your reseller. Enter the XMLTV URL in xTeVe.
This is where I hit a friction point the first time: my provider’s EPG URL required the same username/password as the M3U URL. xTeVe has a field for this, but it’s not labelled obviously. Look for authentication fields below the URL input.
Step 3 — Map channels
Go to Mapping in xTeVe’s navigation. You’ll see all the channels from your M3U playlist listed. Select the channels you actually want to pass through to Plex — trying to push 10,000 channels to Plex creates an unmanageable guide. Filter to the 100–200 channels you’ll actually use.
For each channel, confirm the EPG mapping is correct — xTeVe attempts to auto-match M3U channel names to EPG entries but the matching isn’t perfect. Channels with generic names or slight naming differences between the M3U and EPG data often need manual correction.
This channel mapping stage is the most time-consuming part of the setup. Allow 30–60 minutes depending on how many channels you’re configuring and how accurate the auto-matching is.
Step 4 — Save and verify xTeVe is running
Go back to the main xTeVe dashboard. It should show your M3U source as active, your EPG source as populated, and display the HDHomeRun device URL it’s advertising — something like http://[your-server-ip]:34400. Note this URL.
Connecting xTeVe to Plex
Step 1 — Add tuner in Plex
In Plex Web (accessed from your Plex server), go to Settings → Live TV & DVR → Set Up Plex DVR. Plex will scan for HDHomeRun devices on your network. Your xTeVe instance should appear automatically — it advertises itself exactly as HDHomeRun does.
If Plex doesn’t find xTeVe automatically, click “Don’t see your HDHomeRun device? Click here to enter your network address manually” and enter the xTeVe URL you noted.
Step 2 — Complete the DVR setup
Plex will connect to xTeVe, retrieve the channel list, and ask you to confirm your location for guide data matching. Since you’re using xTeVe for EPG rather than Plex’s own guide data, you’ll want to configure this to use the guide data from xTeVe rather than Plex’s built-in sources.
In the DVR setup, select “Use guide data from the device” rather than Plex’s cloud guide service. This ensures your EPG from the IPTV provider is used.
Step 3 — Wait for guide data to populate
First-time EPG population takes 5–15 minutes depending on how much guide data your provider supplies. Don’t try to use Live TV immediately — the guide will be empty and channels may not load correctly until the EPG sync completes.
Check back after 15 minutes. If EPG is still empty, go back to xTeVe and verify the XMLTV URL is loading correctly. The logs section in xTeVe shows any errors in EPG fetching.
Step 4 — Test a live channel
Navigate to Live TV in Plex. Select a channel. The stream should load within 5–10 seconds. If it doesn’t load or immediately errors, check the channel is active in your xTeVe mapping and that the stream URL format is compatible.
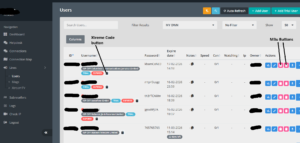
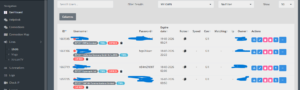
Account Creation Workflow (Reseller Side)
| Step | Action | Where | Result |
|---|---|---|---|
| 1 | Log into dashboard | Main login | Full panel access |
| 2 | Open User Manager | User Management tab | Client list visible |
| 3 | Create account | Add New User form | Setup opens |
| 4 | Select plan | Plan dropdown | Duration defined |
| 5 | Deduct credits | Credit system | Account activated |
| 6 | Generate M3U URL | Cloud system | Stream credentials created |
| 7 | Deliver to client | Encrypted message | Client configures xTeVe |
Real Setup Mistakes I Made With This Integration
Mistake 1: Trying to map all 12,000 channels
First attempt, I left all channels from my M3U playlist mapped in xTeVe and passed them all to Plex. The Plex guide became completely unusable — 12,000 channels in a guide interface designed for 100–200 is a disaster. Channel switching was slow, guide scrolling was painful. Went back to xTeVe and filtered down to 150 channels I actually use. The experience transformed.
Mistake 2: Not waiting for EPG to populate before testing
Tried to load Live TV in Plex about 3 minutes after completing setup. Guide was empty, channels showed as “no guide data.” Assumed the EPG integration was broken. Spent 20 minutes troubleshooting what was actually just incomplete initial loading. EPG population takes time. Wait 15 minutes before concluding anything is broken.
Mistake 3: Using the wrong EPG URL format
My provider offered two EPG URL formats — one with channel IDs matching their M3U naming, one using standard XMLTV IDs. I used the wrong one. xTeVe loaded the EPG data but couldn’t auto-match any channels because the naming conventions didn’t align. Had to manually map 150 channels one by one before I realised I’d used the wrong URL. Switched to the correct format and auto-matching worked for about 80% of channels.
Mistake 4: Running xTeVe on a device that sleeps
Installed xTeVe on my main laptop, which goes to sleep when the lid closes. Every time the laptop slept, xTeVe went offline, and Live TV in Plex stopped working. Moved xTeVe to my NAS which runs 24/7. Problem completely solved. xTeVe needs to run on always-on hardware.
Mistake 5: Not configuring buffer settings in xTeVe
Streams were loading but frequently freezing at the 2–3 minute mark. xTeVe has a Stream Buffer setting — it was set too low for my provider’s stream bitrates. Increased the buffer value in xTeVe’s settings. Freezing stopped. This is the xTeVe equivalent of the buffer control issue in standard IPTV apps.
What Most IPTV-Plex Integration Guides Don’t Tell You
Plex transcoding affects stream quality. When you play a live IPTV stream through Plex, Plex may transcode the stream to match the target device’s capabilities. This adds CPU load on your Plex server and can affect quality. For devices that can handle the original stream format natively (which most modern devices can), forcing “Direct Play” in Plex settings avoids unnecessary transcoding. Go to Settings → Troubleshooting in Plex and look for the Direct Play/Direct Stream options.
EPG accuracy depends entirely on your IPTV provider. If your provider’s EPG data is incomplete or inaccurate, your Plex guide will be incomplete or inaccurate. No amount of configuration fixes bad source data. If EPG quality is important to you, ask your IPTV reseller specifically about their EPG coverage before setting this up.
xTeVe updates can break the Plex connection. xTeVe is community-maintained software. Updates occasionally change behaviour in ways that require reconfiguration. Check the xTeVe GitHub issues page when things break before assuming the problem is your IPTV provider.
Plex Pass is a recurring cost to factor in. The £3.99/month for Plex Pass on top of your IPTV subscription Plans adds to the total cost. For households that heavily use Plex’s other features (remote access, photo library, music server), the Pass is worth it regardless. If you’re only subscribing to Plex Pass for the IPTV integration, factor that cost into your comparison against using a dedicated IPTV app.
This setup doesn’t work on all Plex client devices. Plex Live TV is supported on most modern clients but has quirks on older devices and some smart TV Plex apps. Test on your specific devices before committing to this as your primary setup.
Who This Integration Is NOT For
Users who just want to watch IPTV. A dedicated IPTV app (TiviMate, IPTV Smarters Pro) is simpler, more reliable for IPTV-specific use, and requires no additional software or subscriptions. The Plex integration makes sense for households already invested in the Plex ecosystem who want unification — not as a first-choice IPTV player.
Non-technical users. Setting up xTeVe, configuring EPG mapping, connecting to Plex, and troubleshooting the inevitable first-time issues requires comfort with web-based configuration interfaces, basic networking concepts, and the patience to work through a multi-component setup. If following written technical instructions is stressful, use a dedicated IPTV app instead.
Users without always-on server hardware. xTeVe needs to run continuously for Live TV in Plex to work. If you don’t have a NAS, dedicated media server, or always-on PC, this setup will be unreliable.
Users with large IPTV playlists who want all channels accessible. Plex’s Live TV guide is designed for a manageable channel count. It’s not the right interface for navigating 10,000+ channels. IPTV apps are better suited for large playlist management.
Performance Notes
Running the Plex-xTeVe-IPTV stack on a Synology NAS (DS923+):
- Channel load time: 4–7 seconds from clicking to stream playing
- Guide load time: 2–3 seconds for EPG data to render
- Transcoding impact: Minimal when Direct Play is configured correctly; significant CPU impact when transcoding is active
- xTeVe memory usage: 150–200 MB stable after initial EPG load
- Plex Live TV stability: No crashes during extended viewing sessions once buffer settings were optimised
On a Raspberry Pi 4 (2GB), transcoding 4K content is not viable — the Pi lacks the processing power. For HD streams with Direct Play, performance is acceptable. 4K IPTV streams on Pi should use Direct Play or the Pi needs to pass the stream to a capable client.
Feature Comparison: Basic vs. Advanced Reseller Panel
| Feature | Basic Panel | Advanced Panel |
|---|---|---|
| M3U URL generation | Yes | Yes |
| Xtream codes credentials | Yes | Yes |
| XMLTV EPG URL | Basic | Full with custom mapping |
| Multi-connection accounts | Limited | Full control |
| Real-time stream monitoring | No | Yes |
| Sub-reseller management | No | Yes |
| API access for automation | No | Yes |
FAQ
Do I need a Plex Pass specifically for IPTV integration?
Yes. Live TV and DVR features in Plex — which is what the IPTV integration relies on — require Plex Pass. The free tier of Plex doesn’t include virtual tuner support. There’s no workaround for this; it’s a fundamental Plex feature restriction.
Can I use Xtream codes instead of an M3U URL with xTeVe?
xTeVe primarily works with M3U playlist URLs. If your reseller provides Xtream codes (server address, username, password) rather than a direct M3U URL, you can usually construct an M3U URL from those credentials. The format is typically: http://[server]:[port]/get.php?username=[user]&password=[pass]&type=m3u_plus. Ask your reseller to confirm the exact M3U URL format for their server.
How often does xTeVe refresh the M3U playlist and EPG?
xTeVe has configurable refresh intervals in Settings. The default M3U refresh is every 24 hours. EPG refresh is also configurable — 12–24 hours is typical. If your provider updates their channel list or EPG frequently, more frequent refreshes ensure Plex always has current data. More frequent refreshes add load to your server and provider’s infrastructure; daily is usually sufficient.
Why is my Plex guide showing no EPG data even though xTeVe says it’s loaded?
The most common cause is a channel mapping mismatch — xTeVe has the EPG data but can’t match it to the correct channels. Go to xTeVe’s Mapping section and check whether channels show as “EPG matched” or “no EPG.” For unmatched channels, manually assign the correct EPG entry from xTeVe’s dropdown. Also verify that Plex is using “device guide data” rather than its own cloud guide.
Can multiple household members use Plex Live TV simultaneously?
Yes, with limitations. Each simultaneous stream uses one xTeVe channel slot (configurable) and one IPTV subscription connection. Your IPTV account needs enough concurrent connections to cover simultaneous viewers. A 4-connection IPTV account supports 4 people watching different live channels at the same time. Plex’s server also needs to handle the transcoding load if transcoding is active.
Will this integration work with a Fire Stick as the Plex client?
Yes. The Plex app on Fire Stick supports Live TV playback. Performance depends on whether Direct Play is working — if Plex tries to transcode for the Fire Stick, stream quality and load times suffer. In the Plex app on the Fire Stick, go to Settings → Quality and ensure Direct Play is enabled.
What happens if xTeVe goes offline while someone is watching?
The stream stops. xTeVe is in the active path for all live TV through this setup — if it goes down, Plex can’t reach the IPTV streams. This is why always-on hardware for xTeVe is non-negotiable. Restarting xTeVe restores functionality within about 30 seconds.
The Plex-IPTV integration is one of those setups that takes a few hours to get right and then largely disappears into the background. The payoff is a genuinely unified media experience — your personal library, live IPTV, and Plex’s other features all accessible through a single, well-designed interface.
Get the always-on hardware sorted, don’t try to import your entire IPTV channel list, and give EPG sync time to complete before troubleshooting. Those three things resolve the majority of first-time setup problems.
Contact: IPTV Reseller Panels